Webinar Overview
In this Capilary.io webinar, the founders offer an overview of the platform along with a live capillaroscopy procedure to showcase the power of AI image interpretation. After the procedure they explain how to edit and save images and generate actionable reports using the artificial intelligence system.

This article covers the contents of the webinar in text format for ease of access.
Speakers
There are two participants in this webinar:
- Dr. Borja Gracia Tello - Co-founder at Capillary.io, Medical doctor with a background in internal medicine, specialized in autoimmune diseases and capillaroscopy.
- Eduardo Ramos Ibáñez - Co-founder at Capillary.io with a background in software engineering, machine learning and AI.
What is Capillary.io?
Nailfold capillaroscopy has an important role in assessing microvascular abnormalities.
The procedure is commonly used in rheumatology and internal medicine to monitor and diagnose various conditions, such as:
Connective Tissue Disease
Vasculitis
Rheumatoid Arthritis
Lupus
This is what the Capillary.io artificial intelligence system is all about!
Capillary.io uses the power of AI to automate the detection, measurement, and classification of capillaries in nailfold capillaroscopy images.
How to Get Started in Capillary.io?
Before the procedure, Borja explains how to get started in the Capillary.io application.
Borja – “The first thing we’ll need to do is create a user account on the website – it’s free to access and upload up to 10 images per month!”
After creating a Capillary.io account, you can start making projects.
Projects allow medical professionals to collaborate at the hospital-level all the way down to the individual-level. Use this feature to organize each patient or research case in your preferred way.
What are the Capillary.io Desktop and Web Applications?
Borja – “The Capillary.io platform consists of two parts: a desktop and a web application. This makes it possible for us to use any type of USB microscope and send those images to the web application for analysis.”
Use the Desktop Application to Capture and Upload Images

The desktop application is called CapillaryScope and can be downloaded for Windows or Mac OS X.
CapillaryScope enables you to take nailfold capillaroscopy images and upload them to website in one click. It also supports local file storage on your desktop machine.
Here is a brief overview of the features in CapillaryScope:
Captures nailfold capillaroscopy images with any USB microscope / capillaroscope.
Stores the finger and nail sector per photo in the photo metadata.
Stores magnification level and physical distance information in the photo metadata.
Automatically reads magnification and physical distance information from Smart G-Scope, Inspectis Capillaroscope, Optilia Capillaroscope and Dino-Lite microscopes.
Manual calibration tools for other cameras.
Use the Web Application to Analyze Images and Generate Reports
Capillary.io cloud is the main web application, and you can log in here.
As explained by Borja – “You can send the pictures from the desktop application to the web application automatically. This sends all the necessary metadata to enable the automatic analysis of images per finger and finger sector.”
The web application offers the following functionality:
AI automated capillary detection, measurement, and classification.
Batch image uploading.
Manually view, edit, and create capillary markers.
Generate standardized reports automatically or customize the report template to your unique needs.
Export reports as PDF or Word format.
Create workspaces and collaborate with team members.
Configurable role-based access controls (RBAC) for personal projects.
Track recent activity and visualize capillary changes interactively.
What Microscope Cameras Does Capillary.io Support?
Capillary.io enables you to use any USB microscope or capillaroscope without restriction. This is possible thanks to a manual calibration process, along with bundled calibrations for popular USB capillaroscopes.
The desktop app can automatically read magnification and physical size information from:
It also includes bundled calibrations for:
Borja – “Calibration is important, so that the distance measurements are precise and the capillaries can be measured correctly.”
How to Perform a Capillaroscopy in Capillary.io? (Tutorial)
In this section, Borja demonstrates how to use the CapillaryScope desktop application from start to finish. This includes setting up the USB microscope, configuring preferences, and the image capture process.
Those steps are also outlined below:
1. Connect the USB capillaroscope to your computer.
2. Start the CapillaryScope application, which should detect your USB device.
3. Configure your preferences to select the finger sectors. You can also take panoramic photos as a complimentary option with the Dino Light capillaroscope at low magnification.
4. Apply immersion oil to all the fingers you will be capturing images of.
5. Now you can position the camera to capture the first finger image – the team chose L2 in field A in the webinar.
As a best practice, move the lens to the central part of the finger to improve focus.
Borja – “Once focused in the middle area, we must try to see the entire cuticle. This is where we’ll find haemorrhages; the first capillary line and part of the nail. Be careful not to go too much to the border of the nailfold however, otherwise the capillaries will become horizontal and make visualization more difficult. You need to capture images of capillaries perpendicular to the nailfold.”
6. Once the camera is in position, use either the device capture button, spacebar, or F4 keys on the computer keyboard to capture an image. You can also connect a USB pedal to capture images.
7. Capillary.io will automatically advance to the next finger sector each time you capture an image. If you need to recapture the image or make any other changes, you can go back. Automatic advance can also be disabled in the app settings.
8. Throughout the capillaroscopy procedure, you may notice bubbles or reflections in the image.
Borja – “You must be looking out for possible bubbles or reflections that make the capillaries less visible, in that case apply more immersion oil. Once the oil is applied, the capillaries become visible again.”
9. Continue taking four pictures for each nailfold on each finger. This is recommended to provide plenty of image data for the AI system to analyze.
10. Repeat the process for the second hand. Make sure to monitor for bubbles and reflections in the image, and capture four images for each nailfold on all fingers.
There is no standard technique for holding a capillaroscope and finding capillaries, but Borja offers some guidance.
Borja – “My personal preference is to hold it with both hands; one for moving the capillaroscope, and the other to hold it stable. This helps to focus the pictures and not move while taking images. One technique to find the capillaries is to move the lens a little to the inner part of the finger, then go back up to focus and see the capillaries correctly.”

Is the Capillary.io Algorithm Accurate and Medically Valid?
Yes, Capillary.io has research papers with supporting evidence.
Borja – “In the first paper, we explain the models we built and how they detect, classify, and measure capillaries and hemorrhages. In the second paper, we compare the algorithm results against medical experts in capillaroscopy and achieve a good accuracy against their consensus.”
Here are the research papers:
How to Save a Whole Capillaroscopy in Capillary.io?
At the end of the capillaroscopy procedure, all the photos with fingers and sectors will be ready.
Borja – “The next step is to save the capillaroscopy. In the upper right corner, you can see a big button that will allow us to save the photos to the hard disk. There is also a button to do a direct upload to the Capillary.io platform. No matter which option, the photos are always saved on the device for later use.”
How to Upload Images to the Capillary.io Platform?
After clicking the button to upload to the web application, a form will appear with the following input fields:
Target workspace.
Current project.
Folder location.
Borja – “This is important for collaboration because you can have many workspaces; one private to you, multiple shared with others.”

How to Create or Select a Patient in the Web Application?
Next, you need to create or select a patient to attach the capillaroscopy images to.
Borja has an important warning – “At all times we should use anonymous coding for identifying the patients. We should never upload personal information to the system.”
Once you create the capillaroscopy, it will be given a name. You should also include the reason for the procedure, and the date.
Finally, click the upload button and a capillaroscopy summary will automatically open in the web application.
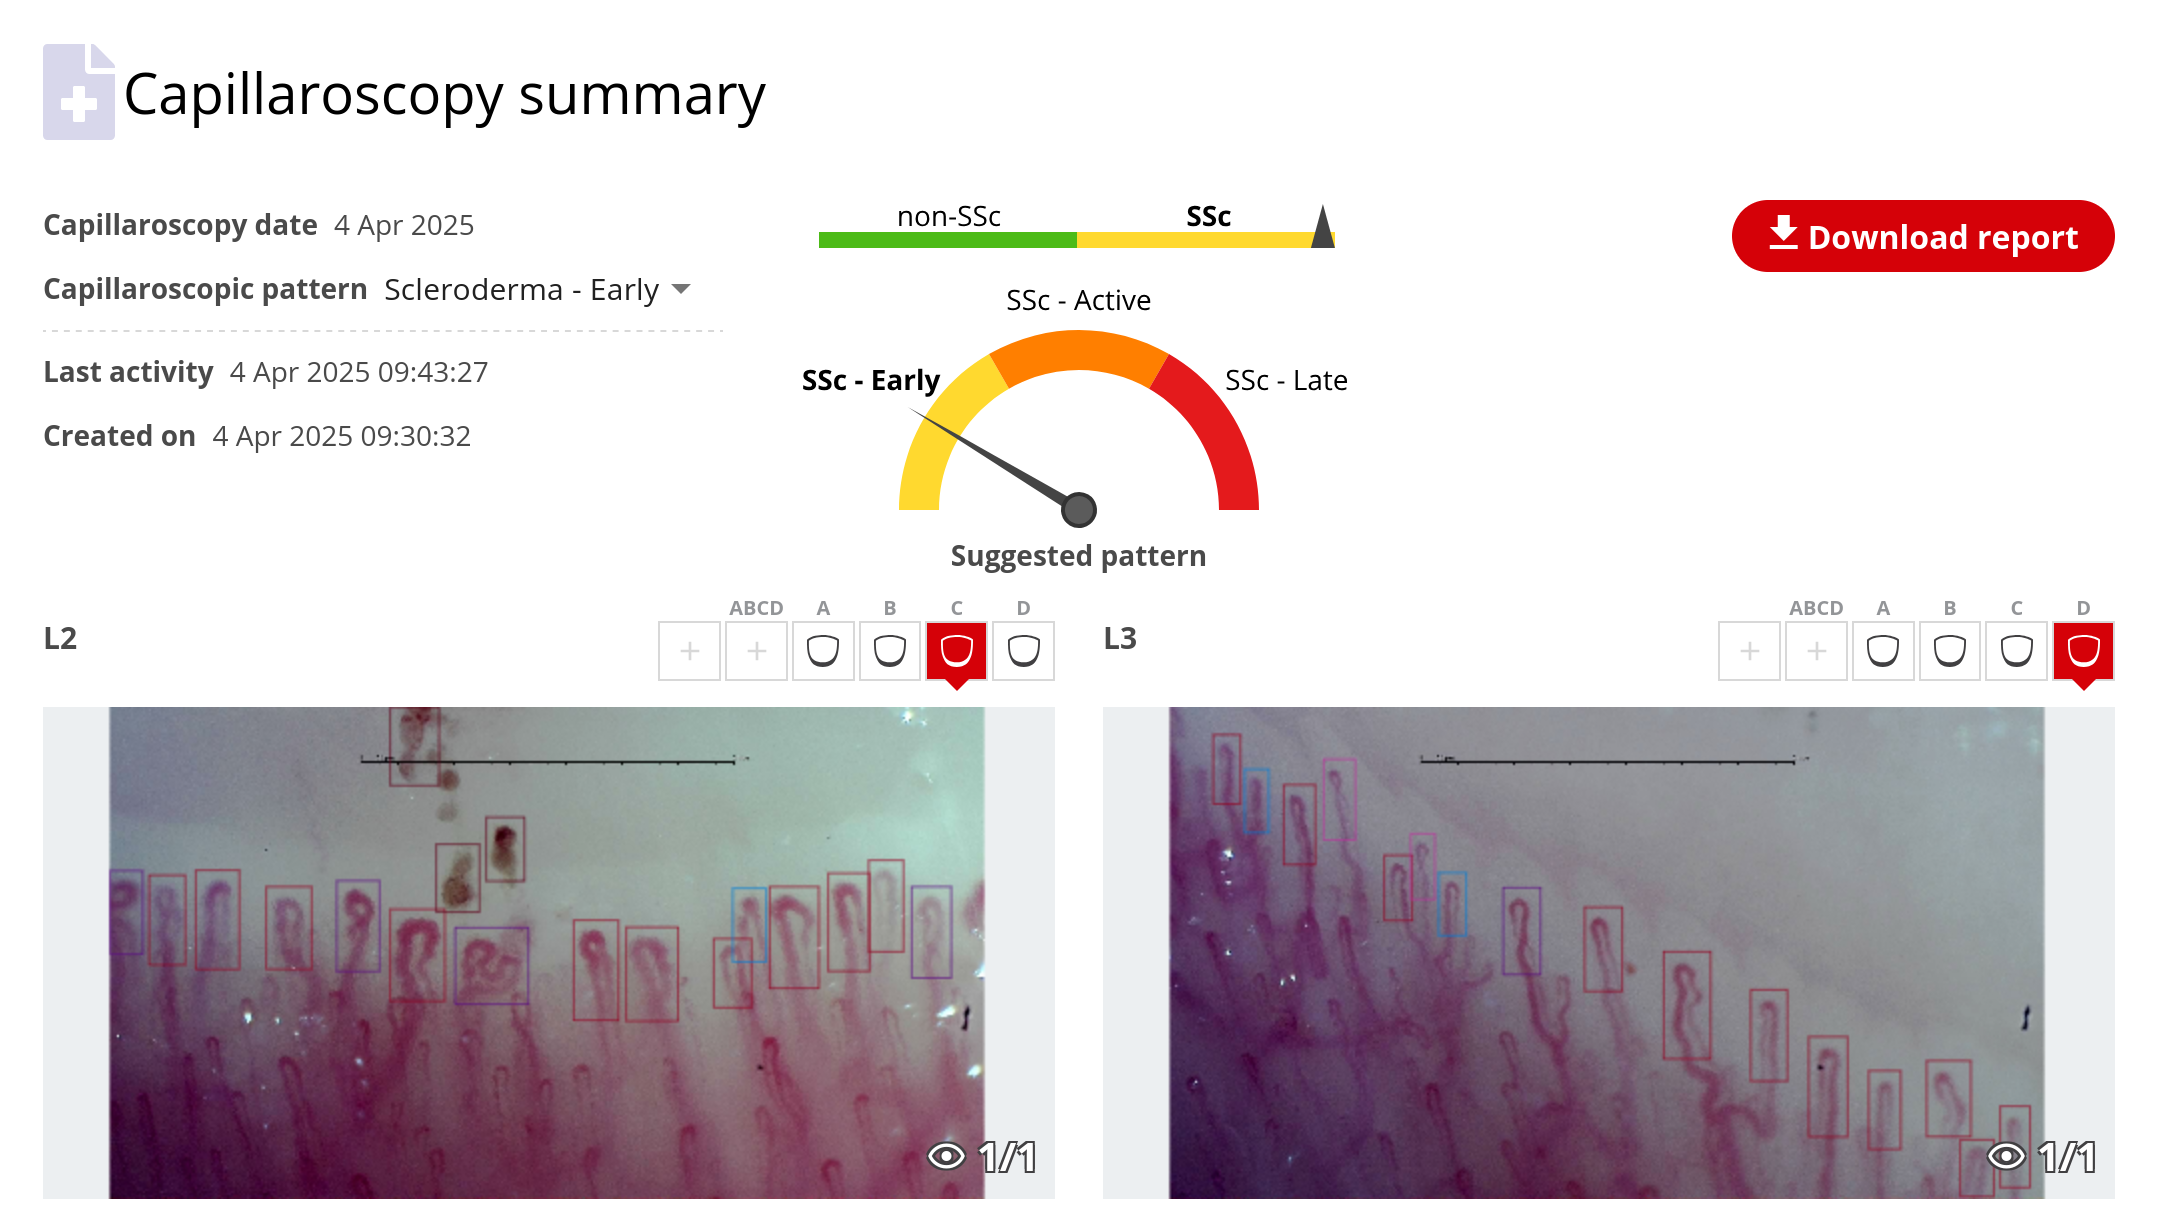
What Does a Capillaroscopy Summary Include?
A capillaroscopy summary contains:
All nailfold images.
AI-generated annotations and measurements for each nailfold sector and finger.
The project.
The save location.
Timestamps and date.
Borja – “The summary also allows us to see the suggested capillaroscopic pattern.”
What Annotations and Measurements Does the AI System Produce?
You can navigate to each image to open a detailed zoomed view that contains annotations automatically produced by the system.
The system includes annotations and measurements such as:
Blue color code for normal capillaries.
Pink color code for capillary tortuosity.
Yellow color code for abnormal shapes.
Dark red color code for enlarged capillaries and ligher red color for giant capillaries.
Apical diameter.
Venous limb width.
Arterial limb width.
Capillary limb width.
Region of interest.
How to Change Annotations and Measurements Manually?
You can select an option in the bottom right toolbar to add, edit, or delete image labels.
The first allows you to add new annotations for missing capillaries. Drag a box and select the type of annotation or measurement.
A second modification tool allows you to change the size, shape, and type of annotation for AI-generated markers.
The third option is to delete annotations, such as incorrect labels by the AI or accidentally created annotations.
The fourth and final option is the measuring tool. This allows you to measure anything in the image and can be assigned a type.
Make sure to save your changes to apply any modifications to the image.
In the webinar video, Borja discovers that the system missed a haemorrhage and adds it manually. He also adds the apical diameter, aterial limb, and venous limb measurements.
How to Save and Review Images and Generate a Report?

Borja – “Once we review the images, we should go to generate a report with the big red button. This will open a form where we can choose to input several medical variables for the patient. These are optional, but any information will help us to perform future research studies.”
Here are the optional fields that you can include in the report:
Personal information such as birth date, sex, and race.
Medical and lifestyle data such as smoker status, dyslipidemia, hypertension, obesity, peripheral artery disease, ischemia, cerebrovascular disease, Raynaud’s status.
Capillaroscopy report options include visibility, capillary flux, venular plexus, used system for imaging, macroscopic alterations.
After filling out any relevant information, click save and download report.
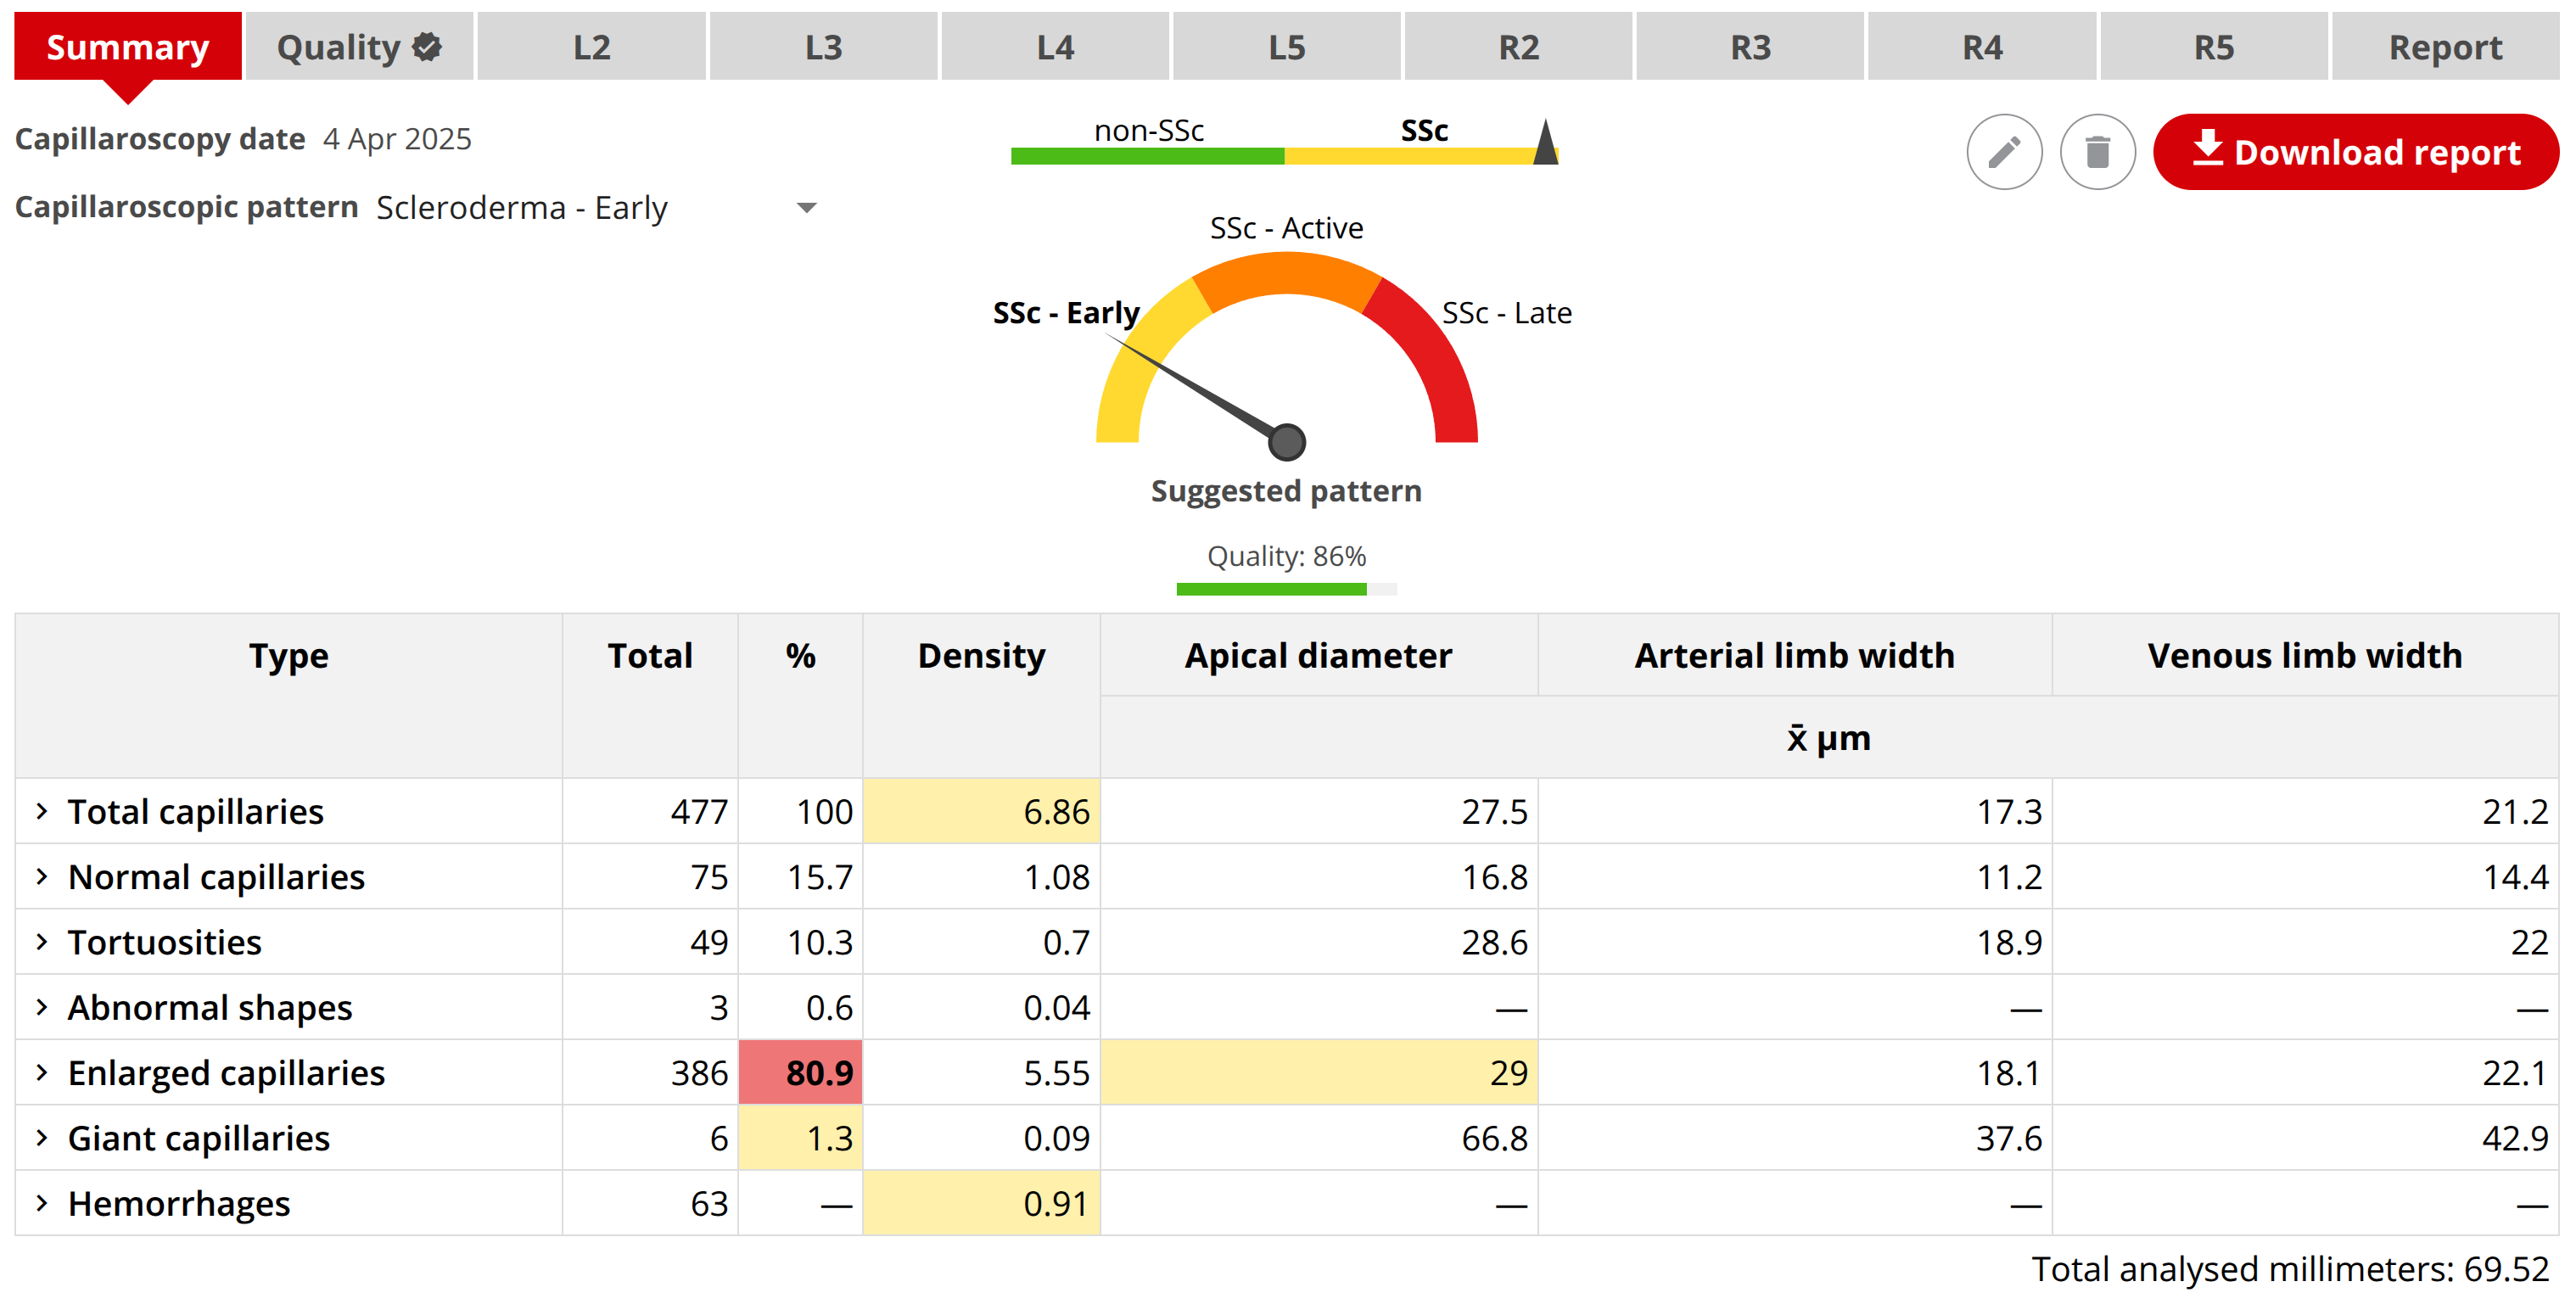
What Nailfold Capillaroscopy Insights Does a Report Contain?
Borja – “The nailfold capillaroscopy report presents all the information in a useful table that is summarized with quantitative data. For example, here we can read there are 7.2 capillaries per mm, with a total of 68.05 mm of analyzed finger area of interest. This is much more information compared to typical capillaroscopies by hand.”
Here is an overview of the capillaroscopy report insights:
Capillary density.
Apical diameter, arterial limb width, and venous limb width for each capillary type.
Percentage of total capillaries for each capillary type.
Tortuosities.
Abnormal shapes.
Enlarged capillaries.
Giant capillaries.
Hemorrhages.
While the report offers a rich range of insights, there are improvements on the horizon.